
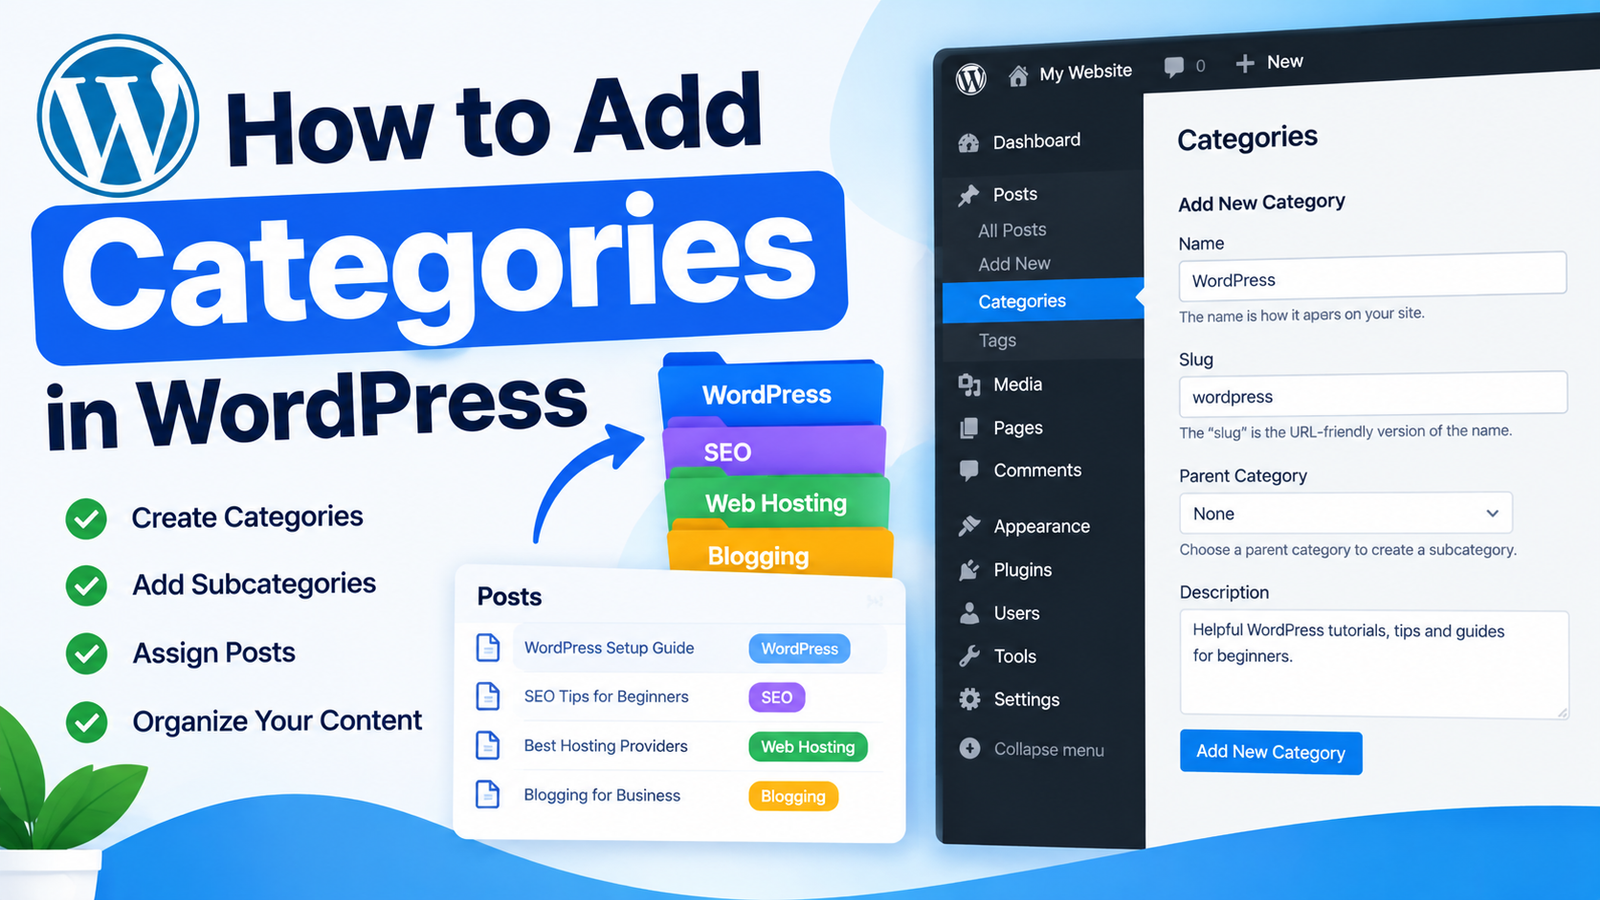
Categories help you organize your WordPress content into clear and useful groups. They make it easier for visitors to find related posts and help you keep your blog organized as it grows.
If you publish articles about different topics, using categories can make your website much easier to navigate. For example, a technology blog might use categories such as WordPress, SEO, Hosting, and Blogging.
If you are wondering how to add categories in WordPress, you can create them directly from the WordPress dashboard. You can also assign categories to posts, create subcategories, and manage existing categories whenever needed.
In this guide, you will learn how to add and manage categories in WordPress step by step.
What Are Categories in WordPress?
Categories are used to group related blog posts together. They create a simple structure that helps visitors browse your content by topic.
For example, a WordPress website could have these categories:
- WordPress
- SEO
- Web Hosting
- Blogging
- Website Design
When visitors click a category, WordPress can display posts that belong to that category.
Categories are especially useful for blogs with a large amount of content. Instead of searching through every post, visitors can select a topic and find related articles more quickly.
How to Add Categories in WordPress
Step 1: Log In to WordPress
First, log in to your WordPress website by opening your WordPress login page.
Enter your username and password to access the dashboard.
Once you are inside the dashboard, look at the menu on the left side of the screen. You will see different options for managing your website.
Step 2: Open the Categories Section
To create a category, go to Posts > Categories.
The Categories page allows you to create new categories and manage categories that already exist on your website.
You will usually see fields for the category name, slug, parent category, and description.
Step 3: Enter a Category Name
In the Name field, enter the name of your category.
Choose a short and meaningful name that clearly describes the type of content it will contain.
For example, if you publish articles about WordPress, you can create a category called “WordPress.”
Avoid creating too many categories that cover almost the same topic. Clear categories make your website easier to understand.
Step 4: Add a Category Slug
The Slug is the URL-friendly version of your category name.
For example, if your category name is “Web Hosting,” the slug could be:
web-hosting
WordPress can usually create the slug automatically, but you can edit it if necessary.
Keep your category slugs short, readable, and relevant to the category topic.
Step 5: Choose a Parent Category
WordPress allows you to create subcategories by selecting a Parent Category.
For example, you could create:
WordPress
- WordPress Themes
- WordPress Plugins
- WordPress Security
Here, “WordPress” is the parent category, while “WordPress Themes” and “WordPress Plugins” are subcategories.
You do not need to select a parent category if you want to create a main category.
Step 6: Add a Description
The Description field allows you to explain what the category is about.
For example, a WordPress category could have a description such as:
“This category contains helpful WordPress tutorials, tips, and guides for beginners.”
Depending on your WordPress theme, this description may or may not be displayed on your website.
Step 7: Create the Category
After entering the required information, click Add New Category.
WordPress will create the category and display it in your category list.
You can now assign posts to this category.
How to Add a Category While Writing a Post
You do not always need to leave the post editor to create a category.
While writing or editing a post, look for the Categories section in the post settings.
You can select an existing category by checking its box. If the category does not exist, WordPress may also provide an Add New Category option.
After selecting the appropriate category, save or update your post.
Choose categories that are genuinely relevant to the article. Avoid selecting unrelated categories simply to add more labels to your post.
How to Edit or Delete a Category
To edit a category, go to Posts > Categories.
Find the category you want to change and click Edit. You can update its name, slug, parent category, or description.
If you no longer need a category, you can click Delete.
Before deleting a category, check which posts are assigned to it. Deleting a category does not normally delete the posts themselves, but those posts may need to be assigned to another category.
Best Practices for WordPress Categories
Keep your category structure simple. A small website usually does not need dozens of categories.
Use descriptive names that visitors can understand immediately. Avoid creating separate categories for very similar topics.
You can also follow these WordPress category organization tips to keep your blog structure clean and easy to manage.
Most importantly, choose categories based on the main topics you regularly publish. This creates a useful structure for both visitors and search engines.
Conclusion
Adding categories in WordPress is a simple way to organize your blog posts and improve website navigation. You can create categories from the WordPress dashboard, add subcategories, assign posts to different topics, and edit categories whenever necessary.
A well-planned category structure helps visitors discover related content without having to search through your entire website.
Start with a few clear categories and expand your structure as your website grows. With the right organization, categories can make your WordPress website easier to browse and manage.
Leave a Reply