
DNS records play an important role in connecting your domain with websites, email services, verification tools, and other online platforms. If you manage a website through Hostinger, you may need to change DNS records when connecting a new service or fixing a domain-related issue.
Many beginners find DNS settings confusing because they include different record types such as A, CNAME, MX, and TXT. However, changing a DNS record in Hostinger is usually simple when you know where to go and what information to enter.
In this guide, you will learn how to change DNS records in Hostinger step by step.
What Are DNS Records?
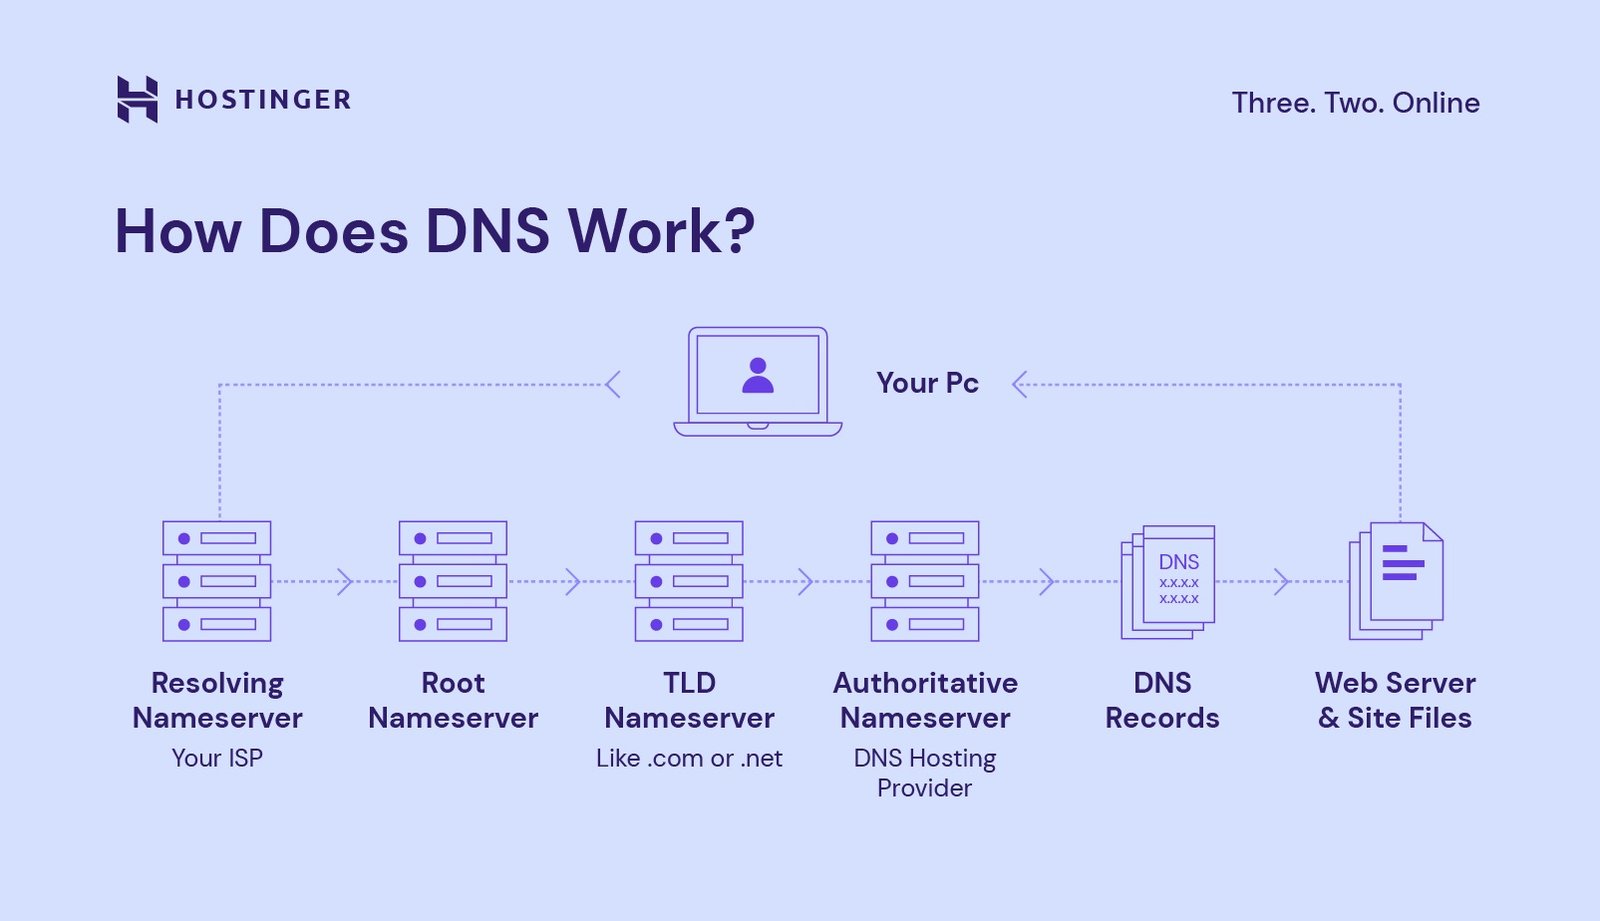
DNS stands for Domain Name System. It helps browsers and online services find the correct server or service connected to your domain.
A DNS record contains information that tells the internet where a domain or subdomain should point.
For example, an A record can point your domain to an IP address. A CNAME record can point one domain name to another hostname. MX records are commonly used for email services, while TXT records can be used for verification and security purposes.
Before making changes, make sure you have the correct DNS values from the service you are connecting to.
How to Change DNS Records in Hostinger
Follow these steps to update your DNS records.
Step 1: Log In to Hostinger
First, open the Hostinger website and sign in to your account.
After logging in, you will see the Hostinger dashboard. From here, you can manage your domains, websites, hosting plans, and DNS settings.
Step 2: Open Your Domain
Go to the domain you want to manage.
Depending on the current Hostinger interface, you may find your DNS management option under the domain or website management area. Look for an option such as DNS / Nameservers or DNS Records.
If you are not sure where the option is located, search within your domain management page for DNS settings.
Step 3: Open the DNS Records Section
Once you open the DNS management area, you will see a list of existing DNS records.
The list may contain records such as:
- A
- AAAA
- CNAME
- MX
- TXT
- NS
- SRV
Each record has different purposes, so avoid changing a record unless you know what it does.
Step 4: Find the Record You Want to Change
Look through the DNS records and find the record that needs to be updated.
For example, if you need to change an A record, find the A record in the list. If you need to update a CNAME record, find the corresponding CNAME entry.
You will normally see information such as the record type, name or host, value or target, and TTL.
Step 5: Edit the DNS Record
Click the edit option next to the record.
You can then update the required information.
For example, an A record may look similar to this:
Type: A
Name: @
Points to: Your IP address
TTL: Default value
The exact value depends on the service or website you are connecting to.
If the instructions you received tell you to use @ in the Name or Host field, enter @ exactly as instructed.
Step 6: Save the Changes
After entering the correct information, carefully check the record before saving it.
Make sure there are no spelling mistakes in the hostname, IP address, or target value. Then click the save or update button.
Your new DNS record should appear in the DNS records list after the change has been saved.
Common DNS Records You May Need to Change
Different services require different DNS record types.
A Record
An A record connects a domain or hostname to an IPv4 address.
It is commonly used when pointing a domain to a web server.
CNAME Record
A CNAME record points a hostname to another hostname.
For example, a service may ask you to create a CNAME record for www or another subdomain.
MX Record
MX records control where email for your domain is delivered.
If you connect your domain to an external email provider, that provider may give you specific MX records to add.
TXT Record
TXT records store text information associated with your domain.
They are often used for domain verification, email authentication, and other services.
If you are working on DNS-related tasks regularly, keep your Hostinger DNS record settings organized so you can quickly identify which records belong to your website, email, or verification services.
How Long Do DNS Changes Take?
DNS changes are not always visible immediately.
After changing a record, it may take some time for the new information to spread across DNS servers. This process is commonly called DNS propagation.
Some changes can become visible relatively quickly, while others may take longer depending on DNS caching and TTL settings.
If your website or connected service does not work immediately after changing a record, wait for propagation before making additional changes.
Important Things to Check Before Changing DNS
Always verify the DNS values provided by the service you are connecting to.
A small mistake can cause a website, email service, or verification process to stop working.
Before editing a record, consider taking note of its existing value. This gives you a reference if you need to restore the previous configuration.
Also, avoid deleting DNS records unless you are certain they are no longer required.
What If the DNS Change Does Not Work?
If your DNS change is not working, check the following:
- Confirm that you edited the correct domain.
- Check the record type.
- Verify the Name or Host field.
- Check the destination or value carefully.
- Make sure there are no extra spaces or typing errors.
- Allow time for DNS propagation.
- Check the instructions provided by your third-party service.
If everything appears correct but the problem continues, check whether the service requires additional DNS records.
Final Thoughts
Changing DNS records in Hostinger is straightforward once you understand the different fields and record types. The main steps are to open your domain, access DNS settings, find the required record, enter the correct value, and save the changes.
Always use the exact DNS information provided by your hosting provider, email service, verification platform, or other third-party service. After making a change, give DNS propagation some time before troubleshooting further.
With the correct information and careful editing, you can safely manage A, CNAME, MX, TXT, and other DNS records for your domain in Hostinger.
Leave a Reply